6
Part Beginners Guitar
Course - Part One
A
FREE
Mini Course Brought to You by
Jamorama
– The
Ultimate Guitar
Learning Kit
YOU HAVE CONFIRMED YOUR SUBSCRIPTION TO THE JAMORAMA NEWSLETTER AND THE FREE 6 PART GUITAR MINI COURSE!
Hi
there and welcome to Part One of the Beginners Mini-Course on Learning How to Play the Guitar. This mini-course gives you a taste of what's covered in Jamorama - The Ultimate Guitar Learning Kit! In this course you will learn
powerful tips and
skills to get you
playing the guitar with the fluency and
accuracy of a professional, and by the end of it you will be able to play a
full song by yourself.
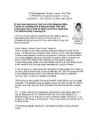
Ben Edwards - Creator of Jamorama
In my
mini-course, this is what you'll learn:
Part One--
Introduction to
the Guitar and How to Play Chords
- Getting into Position . Information that every beginner should know before they start out!
- Introduction to Chords. The basis of all music - Learn A and D and see why learning them with Jamorama is easy .
- Strumming. One of the most important things you must know if you want to progress with your playing.
Part
Two--
Reading Guitar Tablature
- The Fret Tablature relationship . A little tool that will break down the music reading barrier and super accelerate your learning!
- How Tablature works . Get inside information on this brilliant time saving concept .
- The repeat sign.
Part
Three--The Art of
Chord Movement
- Learn the G chord. Add to your database of chords.
- Eigth Note Strumming. And to think, two days ago you could hardly strum a thing.
- Chord Changing. Now you are really cooking with fire and it's sounding hot!
- Warm up exercises. One of the most important things you will ever learn about playing the guitar!
Part
Four --Developing your Strumming
Hand - Missing the beat. This trick will blow you away !
- Building speed . Faster isn't always better, but it's a hell of a lot of fun.
- Mixing chords and varying strums. It's really coming together now!
Part
Five--Playing 'The Midnight
Special '.
- A quick warm up.
- Song sections 1, 2 and 3. Let's break it down Jamorama style!
- Put it together and play along with our vocalist.
Part
Six--Play along with the Full
Jamorama Band !
- You can download a full version of the song that you are going to learn by clicking here !
This
mini-course will give you some basic guitar skills and get you
playing a song, but I can't possibly teach you everything in just six
emails. That's why I've put everything into my course,
Jamorama
the Ultimate Guitar Learning Kit! It's got
so, so much more. It'spacked with cutting
edge material to help you
fast track your guitar learning. You'll learn how to play almost any
song you
hear by ear. Click on the
link below to see exactly how you
can learn to play guitar like a professional!
www.jamorama.com
Now,
let's get into todays lesson.
Getting
into Position
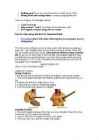
Sitting
Positions There
are two sitting positions for
holding the guitar; classical and
casual.
1.
Pick up the guitar and make
sure that the guitar
body is supported by
your leg.
2. Position yourself at the edge of your
chair .
3.
Ensure that your
back is relaxed but
straight .
4. Lean the guitar
back towards you
slightly .
Standing
Position
1.
Pick up the guitar and
place the
strap over your shoulder.
Adjust the
strap so that the guitar is positioned mid-body.
2. Use your left
hand to support the neck of the guitar.
3.
Rest your right hand
over the
bridge of the guitar.
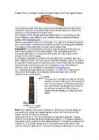
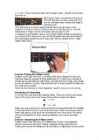
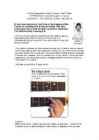
Hand
Positions
It
is important that you relax your wrists and
hands . Straining them can
cause injury.
Front View
Rear View
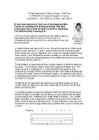
Warning! Make sure that you
never position your hand like this:
Your thumb should never be placed this low on the neck of the guitar as it puts
unneccessary strain on your wrist and thumb.
Fretting
When
you play the guitar, you use your left hand fingers to press down the
strings on the fret board of the guitar and use your right hand to
pluck or strum the stings at the bridge end of the guitar. Using your
left hand to press the strings on the fret board is called fretting.
Here are some tips you will need to know:
1.
Short
fingernails are
essential .
2. Use only the tips of your
fingers to press the strings.
3. When
making a chord, be sure that
each
fingertip is placed directly
behind the fret.
We will
cover chords in lesson one.
4.
Check each
string that it
rings clearly and is not muted or buzzing.
As
a beginner guitarist, it may
hurt your fingers to play. This is
normal. Every guitarist starts this way for the
first couple of
weeks. With
practice , you will develop guitar fingers (
hard skin on
your fingertips).
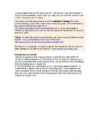
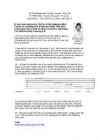
Holding
the Pick
Position
the pick between thumb and index fingers like in the
diagram below:
Time
to take a break. Well
done , you've just completed the first part of
this newsletter. Next you are about to learn about chords and by the
end of this lesson you'll have learnt the A
Major chord.
Don't
forget , for the ultimate guitar learning kit which includes
step -by-step written lessons, video lessons,
audio lessons and
sophisticated software
games , visit Jamorama.com
Now
you are
ready to start your first lesson. Your aim in this lesson is
to learn the A and D major chords and to introduce yourself to
reading guitar tablature. This lesson is very important, so I want
you to really focus.
Remember !
It is more
beneficial for you to practice several
times during a week
than to practice for one long session. This is because your brain
processes information in chunks at a time and it can only
hold a
certain amount in short
term storage .
For
example, with
phone numbers, it is very difficult to remember any
more than 7 digits at a time. Yet if you give yourself time between
practicing, even if it is just 10 minutes, you’ll
find that your
brain is much more efficient at turning your short term practice into
long term
knowledge . More information on effective learning is
contained in Jamorama at Jamorama.com.
Ok.
That aside, let’s get
started on the lesson. To start with, I want
you to have a
look at the guitar neck diagram below and make note of
all the
relevant pieces of information.
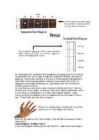
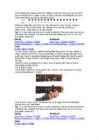
Frets
The guitar neck is
divided into what we call frets, making a fret board. Most guitars have around 20 frets. In this first book, we will focus on the first four, also known as the first position. In book 2, we will
move beyond that.
Notice that we number each fret starting at 1 at the head of the guitar.
Note:
Each string on the guitar is numbered. When you hold your guitar as
you would when using the casual playing position, the 1st string is
at the
bottom and the 6th string is at the top.
Notice
also the term, ‘Tuning’ at the bottom of the
above diagram.
Tuning refers to the
notes that the guitar strings are
tuned to. In
the above diagram, I have given a very common tuning called standard
E tuning that consists of the notes E, A, D, G and B. Strings 1 and 6
are
both tuned to the note E. The
open 6th string is called low E.
The open 1st string is called high E as it is two octaves higher than
the 6th string open E. I will explain notes and octaves to you in a
later newsletter, but for now, you only need to know the
names of the
notes in standard open E tuning.
Now make sure that your guitar is tuned to standard E tuning (the most common tuning). If you don't know how to
tune your guitar, then download my free
guide to tuning your guitar from:
http://www.jamorama.com/tuning/howtotune.pdf . Or if you are
already a
member of Jamorama.com, you can use our guitar tuning software to help you tune your guitar.
**Note: To open the above tuning.pdf file you'll need a
copy of
Adobe Acrobat Reader. You can download a free copy of this from:
http://www.adobe.com/products/acrobat/readstep2.html We will stick to standard E tuning
throughout this newsletter, but you can find
other tunings to play with in our member’s area at www.jamorama.com.
Introduction
to Chords
Now
we are going to look at guitar chords. Guitarists use many different
chords to make progressions or riffs that can then be used to create
songs. If you are not familiar with some of
these terms , it’s ok.
We will cover everything that I am talking about in
good time.
A
chord is defined as a combination of 3 or more notes played together.
To examine this, I want to take a look at chord
diagrams . Chord
diagrams are used to illustrate how a chord is played. They are very
easy to use because they look very much like the neck of the guitar,
in fact, the Jamorama chord diagram is a guitar neck.
As
I said above the Jamorama chord diagrams are going to be
pictures of an ‘actual’ guitar neck so it’s easy to make the
connection between strings and
fingering . There is also a
picture of
the type of chord diagram that
appears in most other Guitar learning
guides. I want you to be
aware of that form of ‘standard’ chord
diagram because you may want to use it when writing up chords on
paper at home.
So,
now that you know what a chord diagram
looks like and how it matches
with the neck of your guitar, it’s time to
come back to what I said
earlier about a chord being a combination of 3 or more notes played
together.
Finger placing symbols are added to the chord diagram so we
know which notes to play. To start with, let’s look at your
fingers.
We give each playing finger a number that we can then match up on the chord diagram (see below).
And
now, let’s look at a full chord diagram. We will use the example of
the A major chord:
Chord
Diagram - A Major Chord
In the chord diagram below you
can see that the A major chord uses fingers 1, 2, and 3. Take note of
how this chord diagram looks - we will use this style from now on.
The A major chord is constructed of the notes A, C# and E. We will cover notes a little later. For now, we will make chords without knowledge of individual notes.
Note
that there is a red dot marking the 6th string on the above chord
diagram. The red dot tells you that you are not to play that string.
The
sixth string of the A major chord is not played, but you play the
rest.
Throughout
this newsletter series, every chord diagram will be accompanied by a
picture of the chord being
held on the fret board and video and audio
of the chord being played for you to check with.
Pictured below is
the A major chord being played.
Exercise :
Playing the A Major Chord
Position each finger with care,
according to the above diagram. Make sure that each fingertip is
placed directly behind the fret. Firstly, pluck across the strings
one by one with your right hand, checking that each string rings
clearly and is not muted or buzzing. Play the first Audio or video
example to hear how the chord should
sound .
Now
that we’ve looked at chord diagrams, I want to move on to
strumming.
Introduction
to Strumming
In a strum there are two
types of guitar
stroke . They are up stroke and down stroke. Throughout this book
these
strokes will be notated as follows:
When
you play a stroke, you strum across the strings just in front of the
bridge of the guitar with the pick in your strumming hand. When
strumming a chord, make sure that you play all of the
necessary strings in the chord. The stroke direction will depend on which
stroke is indicated; up or down as shown above.
Exercise:
Strumming the A Major Chord
Position each finger with
care, according to the A Major chord diagram (above). Make sure that
each fingertip is placed directly behind the fret. Firstly, pluck
across the strings one by one with your right hand, checking that
each string rings clearly and is not muted or buzzing.
Once you are
sure that you are holding the A major chord correctly, practice
strumming the chord in single downward strokes as indicated below:
While you play this, see if you can say out
loud an even 4
count . Another
option if you are a Jamorama.com member is to use the
jamorama metronome - it will help you to
stay in time.
Tip:
You can download a video or audio example of the above
exercise to see and hear it for yourself. The download links are
below (right click on the link and
select "save as"):
Dial Up
Broadband
QuickTime - A Major (1.56MB)
WindowsMediaPlayer - A Major (1.76MB)
QuickTime - A Major (4.00MB)
WindowsMediaPlayer - A Major (5.87MB)
Audio
A Major Mp3 (0.75MB)
Try
your best to start your strum from the fifth string each time you
strum. A major, doesn’t sound bad if you accidentally hit the top
string, although if you want your music to sound professional, you’ll
want to play this chord properly. Remember to stay relaxed. Your
fingers may hurt a little but they will get stronger.
Now
that you are playing the A major chord properly, let’s take a look
at strumming another chord...
The
D Major Chord
The D Major Chord is
constructed of the notes D, F# (F sharp) and A and is played using
fingers 1, 2 and 3:
As
with the A major chord: try strumming the D major chord in downward
strokes with your right hand.
Tip:
You can download a video or audio example of the above
exercise to see and hear it for yourself. The download links are
below (right click on the link and select "save as"):
Dial Up
Broadband
QuickTime - D Major (1.51MB)
WindowsMediaPlayer - D Major (1.97MB)
QuickTime - D Major (3.91MB)
WindowsMediaPlayer - D Major (4.05MB)
Audio
D Major Mp3 (0.73MB)
Note:
The top two, or fifth and sixth, strings are not played in the D
major chord. Make sure that you start your stroke from the
forth string each time you strum D major, it doesn’t sound bad if you
accidentally hit the fifth string, although as with A major above, if
you want your music to sound professional, you need to play this
chord properly.
Congratulations
on getting through your first lesson. Before you go, I want to
mention one last thing. You have the
power to transform your guitar
playing, even if you don't think it. That's because learning guitar
is easy when you are in the right frame of mind and have the right
materials. If you transform your
attitude towards learning and
motivation , you can achieve an amazing level of skill. Guitar
fluency
begins with you!
In
Part Two we will review the 'A' and 'D' chords, we will also be
learning how to read TAB. TAB is a special kind of guitar music. The
lesson will be no problems because TAB is easy to read and easy to
use.
Each
lesson will follow on from the last so you’ll need to practice.
Before
we finish for
today let me ask you a question, where do you see your
guitar skills a year from now? Are you going to be the guitarists you
really want to be?
I
enjoy working with guitar
students and seeing them progress from
beginners through to
intermediate and eventually seasoned,
advanced guitarists. That’s why I created the Mini Course and the Jamorama
Ultimate Guitar Learning Kit – I LOVE TO SEE PEOPLE LEARN TO PLAY
THE GUITAR. Unfortunately not all students accomplish their goals.
Many, if not most, give up their
dream of becoming a great guitarist.
Are YOU going to be one of them?
Are
YOU going to become a polished guitarist? Your experience with the
Mini Course has shown you that while playing the guitar isn’t easy,
YOU CAN MASTER GUITAR SKILLS WITH PRACTICE and good lessons.
I
want to see you
reach your
goal of becoming a great guitarist. The
question is how you can become a great guitarist in the shortest time
possible. There are a LOT of learn guitar courses on the net. They
all make claims about learning guitar in three days or a weekend, and
promise to teach you to be a great guitarist, but YOU KNOW that these
claims
aren ’t true. You already spent some time today on my Mini
Course and you made great progress, but ask yourself, “Am I the ALL
THE GUITARIST I want to be?”
The
key to
success is GOOD GUITAR LESSONS and
commitment . You have seen
and
experienced the Jamorama guitar learning method first hand, and
YOU KNOW THAT IT WORKS. Think of Jamorama as an insurance
policy to
MAKE SURE YOU BECOME A GREAT GUITARIST.
I
can’t
tell you how many times I have heard from students about how
disappointed they were with other guitar courses. Some start Jamorama
and become good guitar players, but many more just plain give up, and
I am sad to see these people give up their dream of being a great
guitarist.
GO
GET YOUR COPY OF JAMORAMA – THE ULTIMATE GUITAR LEARNING KIT. Get
Jamorama here:
http://www.jamorama.co m
Until next time!
Ben
Edwards


Kõik kommentaarid